Candyfab - 3d printer that uses sugar
Electric Foxy a blog about wearable computing, digital fashion, etc.
Make Blog the blog of Make magazine - lots of electronics, open source hardware, and other cool process-based stuff.
Build your CNC - kits, design for DIY cnc router - 4x8' table, build it yourself.
Makerbot Industries - creators of the Makerbot Cupcake, a ~$750 (kit) or cheaper (build it yourself) rapid prototyper
Hack a day - website dedicated to hardware and software hacks
One man's version of a homemade CNC router for PCB routing
Build your own laser scanner $180 software, use a laser level and video camera to make a laser scanner.
Wednesday, October 14, 2009
Monday, September 7, 2009
printing update!
MAC Comp on the left does NOT print to the large format printer.
(but the one on the right does..)
fabric materials, sewing up unfolds...
I'll be joining my template up by sewing: how do I account for seam allowances when dealing with the construction of my form? any tips?
Saturday, September 5, 2009
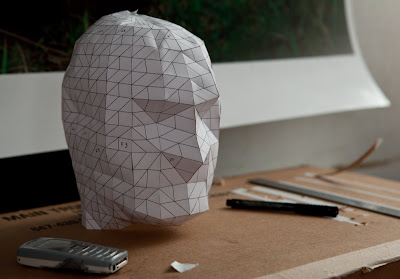
Paper model

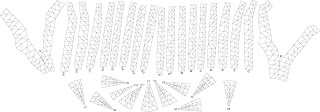
I highly recommend breaking up your model into pieces that will print cleanly. I used the "Extractsrf" command to remove groups of surfaces from the main model, then used "join" to make groups of those surfaces back into polysurfaces. This is all done after you're done converting your mesh back into a nurbs object. Look how clean your print can look!

This particular model is made up of 30 pieces that I separated out thusly (I then printed out this top view as a map for how to reattach all of them) :

Page Tiling Printouts: Printing Large templates on Standard Size Printer
OK, Here's one more post on dealing with printing out your Rhino Unfolds. Of course your first (easiest) option is to print out directly from the rhino file to the large format printer in sculpture. The steps below are a workaround in case you can't get this printer to work - they allow you to break up large drawings and print them out on multiple (tiled) 81/2" by 11" pages on any of the printers in the campus labs including the MAC labs in Patterson building (or on your printer at home). You can then tape these pages together to make a large template. It's much more time consuming but it may be useful in a pinch.
Steps:
1. In your Rhino model select all of the objects in the viewport that you want to print. (It's helpful to export a measurement somewhere on the screen to help with the final scaling)
2. Choose File > Export Selected
3. A popup window will open with options for how where and what filetype you want to export as. The filetype choices are the lower box in this window - choose an adobe illustrator (.ai) file.
4. Chose to export the file at 1 to 1 scale or without scaling.
5. Save to your portable USB drive.
6. Take your USB drive to a computer lab with a printer that you know you can print from and open the file in Illustrator
7. Select File > Print
8. On the left hand side of the popup window select the setup menu.
9. For Tiling select Tile Full Pages
10. Set the overlap amount so that there is enough overlap that you don't lose important information between the pages.
11. Select Print
Friday, September 4, 2009
Sculpture's large format printer settings from a Photoshop file
Hi (again) Digital Hand,
Daniel, Joe, and Yadin have been working on the printers in Sculpture's Tech Room most of the day. Our charge back access is working, but we still have been unable to print.
Here is what to look out for:
If you are printing to the large format printer from a Photoshop file, it is critical that you set the print setting to ASCII only (no other variation of ASCII).
When this setting isn't used, it sends a faulty print job to the printer that jams the entire printing system up, preventing any other print jobs to be sent. The only way to fix it is for Yadin to enter into the printer system, remove the user's erroring print jobs, and then have us turn the printer off and then back on to restart it.
Obviously, we want to avoid this.
There are copies above the computers in the Tech Room explaining the directions on how to choose ASCII when you are ready to print from a Photoshop file.
Getting onto Windows from the Macs in Sculpture's Tech Room
Hi Digital Hand,
Please follow the below steps Daniel Ritter sent us regarding using Windows from our Macs in Sculpture's Tech Room:
1. Shut down the machine normally (do not just power it off)
2. Start the machine up, holding down the "option" key on the keyboard
3. You will be presented with a screen where you have to click on either the "Macintosh" drive or the "Windows" drive: click on the Windows one to continue starting up.
4. Once prompted, log into DCE as you would expect. Then you should be ready to go.
Subscribe to:
Comments (Atom)